
In this article I’ll describe six practical electricity measurement methods, starting with the simplest and progressing toward those that require more effort. Beginners will want to get comfortable with each method before moving on to the next. More advanced readers should feel free to skip ahead to the methods they don’t already know.
Ready? Here we go...
1. Look at your bills.
You probably receive an electricity bill every month. Of course the bill shows how much money you owe, but it also shows how much electricity you’ve used. (If your bill gets sent to a landlord who doesn’t let you see it, then you’ll have to skip this method and go on to the next one.)
Even if all you really care about is money, it’s not enough to look only at the dollar amount on your bill because that amount might not be a good measure of how much electricity you’ve used. It probably includes a base rate that you pay even if you use no electricity, and it might include other utilities besides electricity. Worse, your utility company might have you on an “equal billing” plan that averages your bill over the course of a year, hiding the interesting seasonal changes.
So you want to look on your bill for a number that’s not in dollars but rather in kilowatt-hours, or kWh for short. That number is the actual amount of electrical energy you used during the month. For example, here’s my bill from February 2014, during which I used 146 kWh:

Don’t be shocked if your monthly usage is a lot more than mine! According to official government data, the average American household uses nearly 900 kWh per month.
Besides comparing your monthly electricity use to the average American household (or, if you prefer, to my own), you can learn a lot by comparing to your own usage in other months. Look at a whole year’s worth of bills if you can, to see the seasonal patterns. Many Americans use the most electricity in the summer, when they use their air conditioners; others use the most in the winter, for heating and lighting.
What’s a kilowatt-hour anyway?
A kilowatt-hour is a unit for measuring energy, just as a mile is a unit for measuring distance and a dollar is a unit for measuring money. As with those other units, you’ll develop an intuitive feel for kilowatt-hours as you encounter more examples. Here are a few common household uses that typically consume approximately one kWh each:
- Running a central air conditioner for 20 minutes
- Running an electric space heater for 40 minutes
- Running a modern no-frills refrigerator for one day
- Baking a batch of cookies in an electric oven
- Drying 1/3 of a load of laundry in an electric dryer
- Leaving an LED light bulb on for a few days
- Fully charging a laptop computer battery 10 times
At some point you may want to compare electrical energy to other forms of energy, such as chemical energy (in food or fuels), or thermal energy (heat). Because we can convert one type of energy into another, we really should use the same unit to measure all types—but we don’t! Our inconvenient tradition is to measure food energy in Calories (abbreviated Cal, which scientists call large calories or kilocalories) and, here in the U.S., to measure heat in British thermal units (Btu). You can convert between kWh, Cal, and Btu using Google or various other web sites. The approximate conversion factors are
1 kWh = 860 Cal = 3400 Btu.So the typical American consumes enough food to provide two to three kWh of energy each day (1700 to 2600 Cal), and a typical household furnace can provide about 22 kWh of heat each hour (75,000 Btu). A gallon of gasoline, if you’re curious, provides about 31,000 Cal, or 120,000 Btu, or 36 kWh of energy.
2. Read your meter.
The main problem with electricity bills is that you get only one per month! But the power company determines your billed usage by reading your meter, and you can read it yourself just as easily, as often as you like. (The exception would be if you live in a multi-unit building in which the electricity isn’t metered separately for each unit. In that case you’ll have to go on to method 3.)
Reading the old dial-style meters used to be a bit tricky, but nowadays nearly everyone has a digital meter with a simple numerical readout:

The number on the display, 24362 in this case, is the number of kWh of electricity used since some time far in the past—probably whenever the meter was first installed. (The number may blink off and back on every few seconds, in which case you may need to wait a moment to see it.)
So all you need to do is write down the number from the meter (and the time when you read it), then read it again an hour or a day or a week later, and subtract the two values to get the electrical energy usage during that time period. It’s a great exercise to read your meter once a day for a few weeks or months, and to keep a log of the readings, like this:
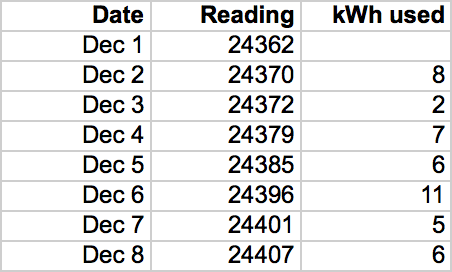
From this kind of data you can get a very good idea of what kinds of activity use the most electricity: When did you run your air conditioner? When did you do laundry? How much energy does your house use on days when nobody is home?
3. Multiply power by time.

To determine the amount of energy used by a device, you multiply its rate of energy use (that is, the power, in watts) by the amount of time that it’s on:
Energy = Power × Time.If we measure the power in watts and the time in hours, then we get the energy in units of watt-hours. A kilowatt-hour is 1000 watt-hours, so we divide by 1000 to get the energy in kWh. For example, the energy consumed by a 10-watt bulb left on for 24 hours would be
Energy = (10 watts)(24 hours) = 240 watt-hours = 0.24 kWh,where I divided by 1000 in the last step. You can similarly estimate the energy use of a 40-watt ceiling fan running for six hours, or of a 1500-watt hairdryer that’s turned on for 10 minutes. Look for power consumption ratings printed on the backs of appliances, or in the owner’s manuals or on the manufacturers’ web sites. Or consult an online list of typical power consumption values. The only catch is that many appliances use less than their nominal power rating under most conditions, or they cycle on and off automatically so that it’s hard to measure exactly how long they’re actually on.
4. Get a plug-in appliance meter.

To use the Kill A Watt meter you simply plug it into a wall outlet (through an extention cord if necessary), then plug your appliance into the meter. Initially it just displays the line voltage (120 or so), but if you press the rightmost button once, it will display the total energy used since you plugged it in, in kWh. Press the same button again and it displays the time since you plugged it in, so you don’t even need to write that down.
You’ll definitely want to use the meter to test your refrigerator(s), preferably for a day or longer. Other good candidates for testing include televisions, computers, washing machines, and electric blankets.
For some devices you may also want to try pressing the meter’s middle button. Then the display will show the instantaneous rate of energy use (power), in watts or kilowatts. This number will probably fluctuate, especially for something like a refrigerator that periodically cycles on and off. But if the power is reasonably steady and you already know how long the device will be in use, then a quick power reading can save you from having to wait for the energy measurement to build up. Just multiply the power by the time, as described above in method 3.
Don’t forget to test low-power devices that are on all the time, such as clocks and WiFi routers and televisions that never go completely off.
5. Time the little blinking squares.
The main drawback of a plug-in meter is that you can’t use it to measure hard-wired devices or 240-volt appliances. For these, and for those times when you’re caught without a plug-in meter within reach, you can go back out to the power company’s meter, equipped with a stopwatch (probably the one on your smartphone).
This time, instead of looking at the numbers on the display, you want to watch the little blinking squares at the bottom. They should go on and off following a six-step pattern:

(The pattern is meant to mimic the horizontal rotating disk in an old mechanical meter, as if half the disk’s edge is dark and the other half is light, with the front turning from left to right.) Each change in the pattern—a square going on or off—indicates one watt-hour of energy usage. Use your stopwatch to time how long it takes between one change and the next. Or, if the pattern is changing quickly, measure the time for the entire six-step cycle and divide by six. Either way, you can now calculate the power being used in your home as follows:
Power in watts = 3600 / (measured time in seconds).Explanation: The energy used during your measured time interval was one watt-hour, or 3600 watt-seconds (since an hour is 3600 seconds). But energy = power × time, so to calculate the power, you divide the energy by the measured time.
You’ve now measured the rate at which all the electrical devices in your home are using energy at a particular moment. The trick, then, is to make this measurement with everything except the device(s) you care about turned off. Try it once with all the major appliances turned off, and the refrigerator unplugged or turned off at the breaker panel, to get a power value for all the little stuff in the home that’s using a small amount of power 24 hours a day. Then turn on a major appliance like the furnace or air conditioner or electric dryer, and make another measurement.
Once you know the power of some device of interest, calculate its total energy use by multiplying by how long it’s on, as in method 3.
6. Install a fancy monitoring system.
The five simple methods described above are more than enough to give you the big picture of your home electricity use, including the information you need to save a lot of money (and help save the planet). But if you want to understand every detail of what’s going on in your home, and you’ve exhausted what you can reasonably learn from the first five methods, then the next step is to install a home energy monitoring system. These systems start at about $150, and the installation process is nontrivial.
Electricity monitoring systems are available in several varieties, from several vendors. I have the Efergy Engage Elite Hub System (recommended by Mr. Money Mustache), which is one of the most affordable and easy to use. But I wish I had spent a little more for Efergy’s True Power Meter, which would be more accurate.
The main components of these systems are a pair of clamp-around sensors that you install on the main feed wires coming into your breaker panel. To install them you need to turn off the electricity (otherwise you may die!), open up the panel, and then hope that there’s enough room to fit the clamps around the stiff wires. (I had a tough time with one of them, but finally managed.) If you have any doubts about your ability to do this installation safely, you should hire an electrician.

For a true power meter there would also be a wire to make an electrical connection inside the panel. Either way, the Efergy sensors connect to a transmitter just outside the panel, which beams the data wirelessly to one or two receivers. The data is simply an instantaneous power measurement for your whole house (or at least as much as is powered by this particular panel), equivalent to what you measured in method 5 above. But the monitoring system makes these measurements continually, day and night, with no need for you to use a stopwatch or a calculator.

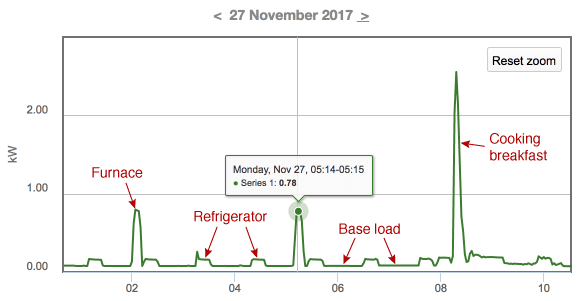
One type of Efergy receiver contains a digital display for immediate readout, updating every ten seconds. This can sometimes be handy, but in my opinion it’s not worth the price or the installation effort by itself. The other type of receiver, though, is a “hub” that uploads the data over your internet router to Efergy’s web site, where you can look up (and even download) minute-by-minute power levels at any later time, from any location, through your web browser. It’s a data junkie’s dream. Here’s a sample of my own data as viewed on the Efergy web site, showing a steady base load, the refrigerator and furnace cycling on and off, and a big spike from cooking breakfast on my electric stovetop:
As I mentioned above, my basic Efergy sensor isn’t always accurate. Specifically, it’s accurate for “resistive loads” like the stove and other heating appliances, but it reads too high a value for anything with a motor in it, like a furnace blower or a washing machine. The reason has to do with the intricacies of alternating current, and the best solution would be to use a slightly more sophisticated system such as the Efergy True Power Meter or The Energy Detective (a competing product that costs a bit more). The power company’s meter also makes accurate measurements, as does a Kill A Watt meter, so I’ve simply used those to calibrate my interpretation of the Efergy data.

